Tampilkan postingan dengan label PHP. Tampilkan semua postingan

Senin, 09 Maret 2015

Explore practical data mining and parsing with PHP

The art of data mining is a wide field, and mentioning the term to two different developers gives you two very different ideas about it. In this article, you learn what data mining is, its importance, different ways to accomplish data mining (or to create web-based data mining tools) and develop an understanding of XML structure to parse XML and other data in PHP technology.

Selengkapnya pada file berikut ini.

Ref


Minggu, 08 Maret 2015

Creating Dynamic Forms ComboBox from Database (MySQL) with PHP

Studi Kasus : Membuat form combobox dengan isian dinamis dari database (mysql)
Kebutuhan : Webserver Packages, already installed.
Combobox merupakan salah satu element form yang sering digunakan dalam aplikasi – aplikasi pendaftaran, pada umumnya combobox digunakan untuk memilih salah satu option dimana terdapat banyak option yang ada. Value dalam combobox sebenarnya dapat ditulis langsung dalam html, namun, bagaimana jika data yang ingin ditampilkan sangat banyak atau tergantung pada kondisi tertentu?
Misalkan, kita ingin menampilkan pilihan kota – kota yang ada dalam negara Indonesia, maka kota yang ditampilkan juga merupakan kota yg berada dalam Indonesia.
Misalkan, user ternyata berasal dari Inggris, maka kota yang ditampilkan juga merupakan kota yg berada dalam negara Inggris.
Kita memerlukan combobox dinamis.
Ok, langsung praktik saja.
Step 1 : Persiapkan Database
  1. Buat database dengan nama db_tutorial
  2. Siapkan tabel dengan nama tb_kota, dengan struktur tabel seperti gambar dibawah ini.
  3. Insert kan beberapa sample data, seperti gambar dibawah
  4. Done!
Step 2 : Persiapkan Folder Kerja
  1. Buat folder dengan nama tutorphp dalam document root anda
  2. Simpan semua file dalam tutorial ini dalam folder tersebut.
Step 3 : Membuat script koneksi ke Database
  1. Ketikkan script berikut,
    <?php
    $host = "localhost";
    $user = "root";//adjust according to your mysql setting
    $pass = ""; //adjust according to your mysql setting, i use no password here
    $dbName = "db_tutorial";
    mysql_connect($host, $user, $pass);
    mysql_select_db($dbName)
    or die ("Connect Failed !! : ".mysql_error());
    ?>
    
  2. simpan dengan nama connect.php
Step 4 : Membuat form combobox dinamis
  1. Ketikkan script berikut,
    <form name='form' method='post' action='prosescombo.php'>
    <h3> Choose Your City</h3>
    <select name="kota">
    <option value=0 selected>- city -</option>
    <?php
    include 'connect.php';
    $q = mysql_query("select * from tb_kota where negara = 'Indonesia' "); //choose the city from indonesia only
    
    while ($row1 = mysql_fetch_array($q)){
      echo "<option value=$row1[kota]>$row1[kota]</option>";
    }
    ?>
    </select>
    <input type="submit" name="submit" value="Submit">
    </form>
    
  2. simpan dengan nama formcombo.php
Step 5 : Membuat menampilkan pilihan
  1. Ketikkan script berikut,
    <?php
    $kota = $_POST['kota'];
    
     if ($kota == '0') {
      echo "anda belum memilih";
     } else
      echo "anda memilih ".$kota;
    ?>
    
  2. simpan dengan nama prosescombo.php
Step 6 : Testing Code
  1. Pergi ke http://localhost/tutorphp/formcombo.php. Anda akan melihat form seperti dibawah. Pilih salah satu option (Disini saya memilih Solo)
  2. Klik Submit dan anda akan melihat hasilnya

Ref

Free Open Source Application base on Codeigniter


CodeIgniter adalah framework yang sangat mudah dipelajari dan cukup ringan. Jika anda tertarik untuk untuk mempelajari CodeIgniter lebih dalam, membaca source code aplikasi open source berbasis CodeIgniter mungkin akan memperkaya pengetahuan anda tentang CodeIgniter.


Berikut beberapa aplikasi open source berbasis CodeIgniter yang bisa anda pelajari :

4 Simple MD5 Login System (+Logout) with CodeIgniter

Case Study : Create Simple MD5 Login System (+Logout) with CodeIgniter
Requirements: Webserver Package, already installed. CodeIgniter bundle.
Login (and Logout) is almost exist in any application that developed with certain programming language, in this case is PHP with framework CodeIgniter. The very basic concept of login is matching the username and password from user with the ones that are in the databases. With a security reason, usually the password is encoded using MD5. MD5 is one of hash function (one-way) that quite popular in cryptography, usually for user autentification.
On the other hand, logout has the simplest basic concept, that is with destroy the user’s session.
Anyway… just let trying it :)
Step 1 : CI Configuration (always start with it)
  1. Open the config.php file located in the system-application-config
  2. Change base_url, adjust according where your ci folder are. FOr example: your ci folder located in www/ci folder
    so change the line $config['base_url']="http://example.com/";
    with
    $config['base_url']="http://localhost/ci";
  3. Setting the database. Open file database.php located in the same folder as config.php. Change hostname, username, password, and the database name according to your mysql setting. For example :
    $db['default']['hostname'] = "localhost";
    $db['default']['username'] = "root";
    $db['default']['password'] = "";
    $db['default']['database'] = "db_tutorial";
Step 2 : Prepare the Database
  1. Make a database named db_tutorial.
  2. Prepare a table named tb_book (for table’s structure, see picture below)
  3. Insert some sample data, for example insert some sample data just like the picture below (REMEMBER : when you inserting some sample data, use MD5 function in to password field —> see the red circle on the picture)
  4. This is the result of sample data (with MD5 password)
  5. Ok, we’re done with database !
Step 3 : Create the Login Form (view)
  1. Type the following script,
    <!DOCTYPE HTML PUBLIC "-//W3C//DTD XHTML 1.0 Strict//EN" "http://www.w3.org/TR/xhtml1/DTD/xhtml1-strict.dtd">
    <html><head>
    <meta http-equiv="content-type" content="text/html; charset=ISO-8859-1">
    <title>Login with CI</title>
    <center>
    <h2> <b> Login with CI </b> <h2>
    <form action="<?=base_url();?>login/proseslogin" method="post">
    <table border="0" align="center">
    <tr>
    <td> Username</td>
    <td> <input name="username" type="text"> </td>
    </tr>
    <tr>
    <td> Password</td>
    <td> <input name="password" type="password"> </td>
    </tr>
    <tr>
    <td> &nbsp; </td>
    <td> <input name="submit" type="submit" value="login"> </td>
    </tr>
    </table>
    </form>
    <?php if(isset($error)) echo "<b><span style='color:red;'>$error</span></b>";
    if(isset($logout)) echo "<b><span style='color:red;'>$logout</span></b>"; ?>
    </center>
    </body></html>
    
  2. Save with the name login_view.php in the system-application-views folder
Step 4 : Create the Processing Controller for Login+Logout
  1. Type the following script,
    <?php
    class Login extends Controller {
    //constructor
    function login() {
    parent::Controller();
    $this->load->helper('url');
    $this->load->helper('form');
    $this->load->library('form_validation');
    $this->load->library('session');
    }
    //index for showing the login form
    function index() {
    $this->load->view('login_view');
    }
    //this function will do the login process
    function proseslogin() {
    $username = $this->input->post('username'); //read the username that filled by the user
    $password = $this->input->post('password'); //read the password that filled by the user
    $passwordx = md5($password); //this is for change $password into MD5 form
    //the query is to matching the username+password user with username+password from database
    $q = $this->db->query("SELECT * FROM tb_user WHERE username='$username' AND userpass='$passwordx'");
    if ($q->num_rows() == 1) {
    // if the query is TRUE, then save the username into session and load the welcome view
    $nama = $q->row()->username;
    $this->session->set_userdata('username',$nama);
    $data['welcome'] = "Welcome $nama";
    $this->load->view('welcome_view', $data);
    }
    else {
    // query error
    $data['error']='!! Wrong Username or Password !!';
    $this->load->view('login_view', $data);
    }
    }
    //to do logout process
    function logout() {
    $this->session->sess_destroy();
    $data['logout'] = 'You have been logged out.';
    $this->load->view('login_view', $data);
    }
    }
    ?>
    
  2. Save with the name login.php in the system-application-controllers folder
  3. Penjelasan :See at the script’s comment.
Step 4 : Create the Success View
  1. Type the following script,
    <!DOCTYPE HTML PUBLIC "-//W3C//DTD XHTML 1.0 Strict//EN" "http://www.w3.org/TR/xhtml1/DTD/xhtml1-strict.dtd">
    <html><head>
    <meta http-equiv="content-type" content="text/html; charset=ISO-8859-1">
    <title>Login with CI</title>
    <center>
    <?php if(isset($welcome)) echo "<h2><span style='color:red;'>$welcome</span></h2>";
    echo "<br/>";
    echo anchor("login/logout", 'Logout') ?>
    </center>
    </body></html>
    
  2. Save with the name welcome_view.php in the system-application-views folder
Step 7 : Testing the Code
  1. Go to http://localhost/namaFolderCIKamu/login
  2. You will see something like this,
  3. Insert the correct username+password, that is the one in the database (username : june, password : june)
  4. You will be redirected into success login page, that is welcome page like in the picture below,

  5. Click logout to logout from welcome page.

  6. Now insert the wrong username+password (for example username : admin, password : admin)
  7. The warning will shown like below.


Ref 

Minimize your URLs in Codeigniter

Don’t wait until your customer or … your browser(!) start to mention that your URL is way to big from the usually title.
Well the first thing that you realize when you install Codeigntier is that the URLs are really huge, not SEO friendly and not user friendly.
Let’s try to minimize as much as we can for your dynamic created URLs. Below we will explain and give solutions to minimize the URLs as much as possible with htaccess, some route tricks and the _remap() method of Codeigniter.

1. Removing the index.php

Let’s start with our big URL:
http://mycustomproject.com/index.php/webpages/view/my-url-title-of-the-post
The first thing that you usually do for your Codeigniter project is to remove the index.php file from the URL. To do it so, it’s really easy:
1st step
Add this code to your .htaccess file to your root of your project.
<IfModule mod_rewrite.c>
# Turn on URL rewriting
RewriteEngine On

# If your website begins from a folder e.g localhost/my_project then 
# you have to change it to: RewriteBase /my_project/
# If your site begins from the root e.g. example.local/ then
# let it as it is
RewriteBase /

# Protect application and system files from being viewed when the index.php is missing
RewriteCond $1 ^(application|system|private|logs)

# Rewrite to index.php/access_denied/URL
RewriteRule ^(.*)$ index.php/access_denied/$1 [PT,L]

# Allow these directories and files to be displayed directly:
RewriteCond $1 ^(index\.php|robots\.txt|favicon\.ico|public|assets|css|js|images)

# No rewriting
RewriteRule ^(.*)$ - [PT,L]

# Rewrite to index.php/URL
RewriteRule ^(.*)$ index.php/$1 [PT,L]
</IfModule>
After the creation of the .htaccess file your project structure will have to look like this:
website_folder/ 
–––– application/ 
–––– assets/ 
–––– system/ 
–––– user_guide/ 
---- .htaccess <-------------------------
–––– index.php 
–––– license.txt
2nd step
Now go to : application/config/config.php and change the:
$config['index_page'] = 'index.php';
to
$config['index_page'] = '';
So now your URL will look like this:
http://mycustomproject.com/webpages/view/my-url-title-of-the-post
Note 1: If you are running in your local machine and your don't have configured the virtual host for example to be :
http://mycustomproject.com/webpages/view/my-url-title-of-the-post
but your URLs looks more than this:
http://localhost/website_folder/webpages/view/my-url-title-of-the-post
don't forget to change your RewriteBase from:
RewriteBase /
to
RewriteBase /mycustomproject/
or something similar it depends of where your Codeigniter project starts.
Note 2: In some cases perhaps you will realize that your .htaccess simply doesn't work and all the webpages URLs show the index webpage. If this happens to you then go to application/config/config.php and change the:
$config['uri_protocol'] = 'AUTO';
to:
$config['uri_protocol'] = 'PATH_INFO';
or:
$config['uri_protocol'] = 'REQUEST_URI';
it depends of your server's configuration. To try it just change it and see if the URL works for you correctly
Note 3: If you prefer to add a less secure .htaccess for your project, much more minimal and you don't want to write each time the exceptions of the files that you don't want to included them to the rules, you can simply use this code:
<IfModule mod_rewrite.c>
RewriteEngine On
RewriteBase /
RewriteRule ^index\.php$ - [L]
RewriteCond %{REQUEST_FILENAME} !-f
RewriteCond %{REQUEST_FILENAME} !-d
RewriteRule . /index.php [L]
</IfModule>
This is the most common .htaccess (it is also used from the default installation of WordPress) thought it is not suggested as you don't protect your folders if the index.php is missing or a new file/folder is added to your project without knowing it.

2. Removing 1st URL segment

So now that we removed the annoying index.php from URL let's minimize our URLs with the routes.
Our basic example that we will work with is the below:
<?php if ( ! defined('BASEPATH')) exit('No direct script access allowed');
class Webpages extends CI_Controller {
 
 function __construct()
 {
  parent::__construct();
 } 
 
 function index()
 {
 
 }
 
 function about()
 {
 
 }
 
 function blog($url_title = '')
 {
 
 }
 
 function view($url_title = '')
 {
 
 } 
 
}
To remove our first segment we have to choose which our base Controller will be. In our case we will choose that Webpages will be our basic Controller. The Controllers Admin and Forums will be our secondary let's say Controllers
There are two ways to minimize your URLs:
  • Routing by hand
  • Routing automatically (I always prefer this one)

Routing by hand

So let's see how we can can minimize our URLs by hand. This means that everytime we add or edit a function at our Controller we have to go to : application/config/routes.php
and change the routes in each case. So let's have an example of our basic controller:
Go to application/config/routes.php and add something like this:
$route['default_controller'] = 'webpages'; //Our default Controller

//Get rid of the first segment (in our case we get rid of webpages)
$route["about"] = 'webpages/about'; 
$route["blog/(.*)"] = 'webpages/blog/$1';
$route["view/(.*)"] = 'webpages/view/$1';
So now with this simple code we have get rid of the first controller name from our basic webpages.

Routing automatically

Many of you probably already know it but it is really boring to create the routes every time by hand. So that's why I created an automatically routing that actually removes the controller of your default controller. The below code is written to handle all the scenarions. Simple URLs and multilingual URLs. Let's go and take a look of our routes how it will look like.
If you don't have a multilingual website the routes are easy. You can simply copy the below code to application/config/routes.php:
$default_controller = "webpages";
$controller_exceptions = array('admin','forums');

$route['default_controller'] = $default_controller;
$route["^((?!\b".implode('\b|\b', $controller_exceptions)."\b).*)$"] = $default_controller.'/$1';
$route['404_override'] = '';
If you are having a multilingual website, it is a bit more complicated as you have lot of scenarios to cover. However don't worry about it as you can simply copy the below lines of code to application/config/routes.php:
$default_controller = "webpages";
$language_alias = array('gr','fr');
$controller_exceptions = array('admin','forums');

$route['default_controller'] = $default_controller;
$route["^(".implode('|', $language_alias).")/(".implode('|', $controller_exceptions).")(.*)"] = '$2';
$route["^(".implode('|', $language_alias).")?/(.*)"] = $default_controller.'/$2';
$route["^((?!\b".implode('\b|\b', $controller_exceptions)."\b).*)$"] = $default_controller.'/$1';
foreach($language_alias as $language)
 $route[$language] = $default_controller.'/index';
$route['404_override'] = '';
So let me explain how it works.
The only thing that you will actually care to change is the first three lines of code:
$default_controller = "webpages";
$language_alias = array('gr','fr');
$controller_exceptions = array('admin','forums');
As it is the only one that you actually need to change. So how it works? It's really easy.
You add your default controller to your variable $default_contoller.
The $language_alias is the language element that you want to add if you have a multilingual website for example:
http://mycustomproject.com/blog
http://mycustomproject.com/gr/blog
http://mycustomproject.com/fr/blog
And of course the http://mycustomproject.com/gr and http://mycustomproject.com/fr are routing to the index of your basic Controller.
The $controller_exceptions are the controllers that will NOT follow this routing structure. For example:
http://mycustomproject.com/admin/
http://mycustomproject.com/forums/
So you can easily use the controller with name Admin and controller with name Forums with the same way as you used it before.
Now we removed our first segment so our dynamic URLs will look like this:
  • http://mycustomproject.com/about
  • http://mycustomproject.com/view/my-url-title-of-the-post
  • http://mycustomproject.com/blog/url-title-of-post

3. Removing 2nd URL segment

One way to do it is by using the _remap() method of Codeigniter. For more go to Controllers User Guide and search for the _remap() method. Let's have an example of how to use it:
<?php if ( ! defined('BASEPATH')) exit('No direct script access allowed');
class Webpages extends CI_Controller {
 
 function __construct()
 {
  parent::__construct();
 }

function _remap()
{  
 $segment_1 = $this->uri->segment(1);

 switch ($segment_1) {
  case null:
  case false:
  case '':
   $this->index();
  break;

  case 'about':
   $this->about();
  break;
  
  case 'blog':
   $this->blog($this->uri->segment(2));
  break;   
 
 default:
  //This is just an example to show 
  //the 404 page if the page doesn't exist
  $this->db->where('url_title',$segment_1);
  $db_result = $this->db->get('webpages');
  
  if($db_result->num_rows() == 1)
  {
   $this->view($segment_1);
  }
  else
  {
   show_404();
  }
 break;
 }
} 

 function index()
 {

 }

 function about()
 {

 }

 function blog($url_title = '')
 {

 }

 function view($url_title = '')
 {

 } 
 
}
So when you are using the _remap function of Codeigniter you have to decide which method will use every time. The good part is that you will have full control of what to do with each method. However it can take lot of time if you have many functions in your controller. So now your URLs will look like this:
  • http://mycustomproject.com/my-url-title
  • http://mycustomproject.com/about
  • http://mycustomproject.com/blog/url-title-of-post

Are you done with reading? Well you can now download the files that we used at this post or you can view the files from github

Ref

CodeIgniter Autocomplete

Codeigniter is a great framework for php . It is simple and already helps lot of people to write faster code. The documentation is very good with examples for all the classes – functions.
But (there is always a but…!) in eclipse we used to have our own classes and when we write the “magic arrow” -> we are waiting to have a dropdown list with the functions/variables that the class have .
In Codeigniter till now we write for example $this->session-> … and then we go to the codeigiter website just to see what was the name of the function .
For that reason I created a fake Controller. This is only a fake Controller and it used ONLY for the autocomplete. You can copy paste it WHEREVER you like in the project (because is fake).

Ok lets see it how it works .
1st Step
Download the zip file :
or
or
Download the latest development edition from github repository:https://github.com/scoumbourdis/codeigniter-autocomplete
2nd Step
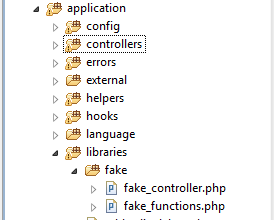
Copy it somewhere in your project (I’ve copy it into libraries in a folder named fake)
3rd Step
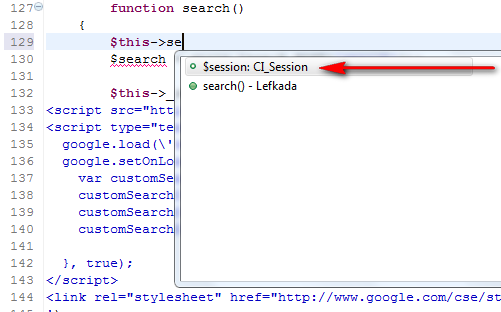
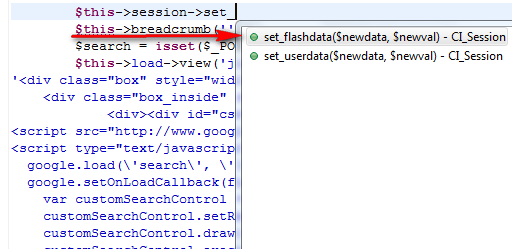
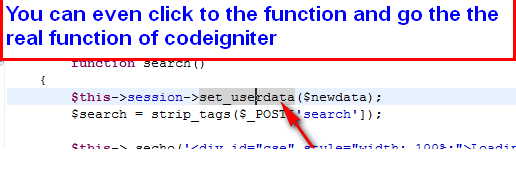
Start typing in your Controller :-). That’s it. Pretty easy right? Below there are some images to show what you are be able to do.
It works fine in eclipse,netbeans and Aptana.


grocery CRUD for codeigniter

This is a codeigniter CRUD. It is fully tested in codeigniter 2.0 and in 1.7.x. It is simple and has many features . The main feauture is that a customer can easily use this crud, not only a developer!!
The installation is really simple , you just copy the files into your project and run the controller examples to see the results of the CRUD. You can name your controller whatever you like.
You can donwload the zip file and you can see the user guide with working examples by clicking the link below .

PHP Object Oriented Programming for Newbies

This article analyzes the reasons of using Object Oriented Programming for PHP newcomers. In his opinion anyone can found thousands of tutorials for Object Oriented PHP and Object Oriented Programming. But what about a different… newbie PHP approach?
object-oriented-chaos
My approach is to convenience newcomers from PHP background to learn Object Oriented Programming. As there are plenty of tutorials out there, I will try to explain only some basic things about OO Programming with a simple way.
The only requirements to actually read this article is to have a very first impression of PHP. Even if the only thing that you have learned so far is:
<?php echo "hello World!"; ?>
You should still learn how to program with Object Oriented Programming. Crazy, huh? Why from using the simple functions in PHP we should learn to write code like the code below?
namespace Foo\Bar {
    class Baz implements BamAwareInterface {
        public $bam;
        public function setBam(Bam $bam){
            $this->bam = $bam;
        }
    }
    class Bam {
    }
    interface BamAwareInterface
    {
        public function setBam(Bam $bam);
    }
}
Well let’s start then…

The paradox

I have many years experience in Object Oriented programming with PHP but with Java as well. I remember my very first approach at the university with Object Oriented Programming and Java. They didn’t teach us WHY to use Object Oriented programming, they just teach us that THIS is Object Oriented Programming and some ways that we can use it.
The paradox about that is that from the basic steps of programming you need to jump to Object Oriented programming. It was for me like learning addition in Math and then jump straight away to rocket science! So this was my first experience about Object Oriented programming. I was using 4 years object oriented programming in Java but I couldn’t understand what was the real reason to use it. For me it was just a necessary evil to learn it as in my mind it was something that I HAD to write in order to get the expected results.
I can give you a simple example. The very basic example that I’ve started with in Java was:
public class Root {
    public static void main(String[] args) {
        System.out.print("Hello World\n");
    }
}
The problem here is that I don’t need all of these and I didn’t even know what the “class” was or what the “public” or what the “static” or what the “void” means… . The only thing that I wanted to do is to have a very first “Hello World” in my screen. So I just copy-paste the class with the unknown public static void main(String[] args) { in order to make it work!!

Hey wait! Are we talking about Java or PHP?

Don’t worry we are getting there…
In PHP the same example, can be easily written like this:
<?php print "Hello World!";
And with this code I can straight away understand that “<?php” is to start php code. Easy to remember and next time I will not have to copy my previous code in order to print something on my screen. It is bad to copy something without knowing and understanding the reason that this is there. What I am trying to say is that it is always better to start USING classes only when you REALLY know what they are doing.

Why OO Programming?

PHP gives us the opportunity to not use Object Oriented Programming if we don’t really need it. This is very cool as Beginners can create a whole website without using any object. So why to use Object Oriented Programming?
It took me 2 years to actually realize the power of Object Oriented Programming! Of course while you are now reading this article you will think that I have a comprehension problem. Although this is not the case! At the very first moment when I started learning why to use Object Oriented Programming, I understood it pretty well. I understood pretty well that your code can be much more extendable and testable and lot of more things like that. However to actually REALIZE the importance of Object Oriented Programming needs time and lot of practice. In the real world (especially at work… world) things are different. In the real world the business only cares for the actual results that our code is rendering. When we are coding the only thing that we have in mind is “How can I get the expected results with the fastest possible way?”. This is the wrong way to think and I will prove it with an example.
So let’s start with a very basic page in PHP. Let’s say that we want to show the user’s first name and last name when he/she firsts login. Also let’s say that there is lot of pressure at the office and this need to be ready… now :) .
Our first attempt is without using objects at all.
<?php
$con = mysqli_connect("example.com","peter","abc123","my_db");

if (mysqli_connect_errno($con)) {
  echo "Failed to connect to MySQL: " . mysqli_connect_error();
}

$result = mysqli_query($con,"SELECT * FROM users WHERE user_id = '". mysqli_real_escape_string($_GET['user_id'])."'");

$row = mysqli_fetch_array($result)

echo "<div>";
echo $row['first_name'] . " " . $row['last_name'];
echo "</div>";

mysqli_close($con);
?> 
So with the above example our request is done. So as for the request. “I want you to show me the first and last name when the user firsts logged in.” , it is done! Your boss is very proud of your work. You are very proud as this was really easy and it was really fast as well. Moreover as we don’t have a big experience with coding, we are happy that the results are actually showing at the screen.
This is a completely wrong way to think though. Your code isn’t there to be executed only once. This code will be executed now and it will be there in the future (your code lifetime can be 4 months, 1 year… maybe 10 years!). So at one point this code need to change. So your code will never actually be exactly the same for ever. So for this specific example, we can see there is only one situation that the User’s first name and last name will appear. Only if we have the user_id at the URL as a GET parameter. So let’s say that we revisited our code after 1 month. Customer saw that user’s where adding URL’s like http://www.example.com?user_id={random_id} and they where looking the first and last name of other users at the website. Also we realized that we don’t only need to show the first name and last name once but we want to show it everytime (e.g. with a session) when a user is logged in.
One month later you see your own code and you don’t remember what you had done so you start reading again your code line by line.. So as we can see it was fast at the beginning but it is not so fast now that you are searching all your code to check where to change your $_GET[‘user_id’] with $_SESSION[‘user_id’] . Your code is not readable and you are changing your whole code again and again with each request. Some requests can come later like “We want when the user is not logged in to show a button ‘Register’ and redirect him to a registration page.”, “We want to add the email of the user as well so it will be: John Smith (john@smith.com)” , “As this functionality is working well we need to implement it to our back-office as well”… .e.t.c. As you can see lot of small changes can happen but with the above code one thing is for sure. You will always read all of your code to understand what is going on and the tasks will getting more difficult and more difficult. A small example about a messy code that I have in mind is the below:
<?php
$con = mysqli_connect("example.com","peter","abc123","my_db");

if (mysqli_connect_errno($con)) {
  echo "Failed to connect to MySQL: " . mysqli_connect_error();
}

if (isset($_GET['user_id'])) {
 $result = mysqli_query($con,"SELECT * FROM users WHERE user_id = '". mysqli_real_escape_string($_GET['user_id'])."'");
}elseif (isset($_SESSION['user_id'])) {
 $result = mysqli_query($con,"SELECT * FROM users WHERE user_id = '". mysqli_real_escape_string($_SESSION['user_id'])."'");
}

if (!isset($result)) {
 $row = mysqli_fetch_array($result)

 echo "<div>";
 echo $row['first_name'] . " " . $row['last_name']." (".$row['email'].")";
 echo "</div>";
} else {
 echo "<form action="/register-form.php"><button>Register</button></form>";
}
mysqli_close($con);
?> 
Your code is already a mess. It is difficult to do any change. It is difficult to understand what is going on and you can easily do mistakes.

Objects for the Rescue!

So now that we have a very first impression of our request, let’s re-create our example from scratch!
I will try to explain as less as possible for the object interfaces… e.t.c. as this is not the purpose of this article.
Let’s see our final re-make of our code with OO programming.
//Get User's info by the userID
$user_info = User::getUserInfoById($user_id);

//Render data to the View
$view = new View();
$view->user_info = $user_info;

$view->render('user_details');
As you can see your code is now much more readable (That’s 1). We can now read it and add some automated tests to our Objects as well (That’s 2). Many people may ask where the rest code gone? Where is the database connection, where is the redirection, where is the $user_id is coming from? This doesn’t really matters as it is happening at a separate place of the code. Probably a different file. And this is one more thing that OO Programming is offering to you, you separate your code to different files and you can have a better structure of your code (That’s 3). For example we have different file for Presentation (View), different file for database connection (config) and different file for our business logic (Controller). One more thing that OO Programing is offering is the Don’t Repeat YourSelf (DRY) principle (That’s 4). And once you have all the good benefits of OO Programming your gift is that your codewill be extendable for the future (That’s 5)
People may thing that objects are bad! They are complex, they are confusing and they are hard to learn. I am sorry people but that’s wrong! Objects are good for anyone! Many people think that Objects are evil and they are trying to make our life harder. Convince yourself that Objects are Angels that trying to save you from long term problems . It will save your time and effort. Objects Oriented programming is like Batman in Gotham City… many people think that he is evil, but he is always there to save you from the bad people (in our case bad coding :) ).
object oriented for the rescue
So let’s have a summary:
1. Your code will be more readable.
2. Your code is testable (for example you can use automated tests like PHPUnit)
3. Your code will have a better structure.
4. You will follow the DRY principle at your code (and this will make you proud)
5. Your code will be extendable for the future.
Now in my opinion few more things that OO can help is:
6. You can get a better quality job if you know OO Programming as business will understand the difference.
7. You can be more proud of yourself when you are coding.
8. You can communicate with other developers in all around the world more easy.
There are plenty of other benefits that OO programing is offering. This article is pointing only few of them.

You convinced me, what is the next step?

If you are really interested about OO Programming in PHP, you can learn more by reading this article . It is a very good start and it has lot of examples.
Once you are done with learning OO Programming, you can start using an MVC PHP Framework for your project. Don’t be afraid to start using them. They are lot of them out there and it doesn’t take a big effort to install them! Here is a list of the most famous ones (starting from the simplest one):
– Codeigniter
– CakePHP
– Yii
– Laravel
– Symfony
– Zend Framework
Want to learn even more? You want to learn the real OO design principles and why everything your boss told you about inheritance might be wrong (and what to do instead)? Head First Design Patterns is the the book that made me realize the power of OO Design Patterns. Why don’t you give a try?
I hope you will enjoy OO Programing as much as I do. Any comments or suggestions are always welcome. Happy coding :)


Sumber